A successful installation depends on more than selecting a black slab: the builder must control measurement, lot approval, fabrication, substrate preparation, fixing, and handover records. By the end, you will know what to provide before ordering, what to inspect before cutting, which site conditions to confirm, and which documents to obtain from the supplier and fabricator.
Key takeaways
- Measure the finished position, not only the masonry opening.
- Approve the actual slabs before cutting or edge fabrication.
- Match the fixing system to the application and substrate.
- Inspect placement, joints, edges, and finish before handover.
Start with a site survey, drawings, and a complete order brief
A masonry opening is not a finished measurement. Before ordering, the Pune builder must provide a site survey, coordinated drawings, and an order brief that accounts for the stone’s final position, access, and fabrication limits. Measuring only the wall or cabinet opening can produce a slab with unusable cut-outs or the wrong finished height.
1. Record the application for every area: kitchen counter, vanity, stair, floor, wall, threshold, sill, or exterior surface. State finished length, width, thickness, counter or floor level, joint positions, overhangs, stair nosings, edge profiles, sink and hob cut-outs, tap holes, drain openings, and required polish or finish.
2. Attach dimensioned architectural, structural, kitchen, and plumbing drawings. Mark site tolerances, adjoining materials, movement joints, support locations, and the direction in which each slab should run.
3. Include the access plan: loading point, lift dimensions and capacity, stair route, doorway widths, storage area, crane or trolley restrictions, and the permitted installation date. Large slabs can arrive correctly fabricated yet fail at the last turn.
4. Specify the required quantity with cutting allowance, slab thickness, finish, calibration, lot, source, and approval-sample requirements. Request the supplier’s slab photographs, markings, and available test data before confirming the order.
This brief gives the R Black ASD granite contractor enough information to plan how R Black ASD granite installation works in Pune, price fabrication accurately, and flag an impossible detail before cutting begins.
Approve the actual slabs before fabrication begins
Do not release an R Black ASD slab to the saw because its colour looks right. Approve the identified lot against a physical sample, supplier records, and a dry layout; slabs sold under one trade name can differ in shade, veining, porosity, thickness, and repair content.
1. Match every slab to the invoice description, slab markings, quarry or processing source, lot number, nominal thickness, finish, calibration, resin or mesh backing, and supplier’s test data. Photograph each slab and record its dimensions before moving it to fabrication.
2. Inspect the polished face and edges for cracks, open fissures, corner damage, cloudy patches, polishing marks, and inconsistent colour. Check the back for resin-filled areas, fiberglass mesh, loose sections, and visible bowing. Resin or mesh is not automatically a rejection, but it can change cutting, edge work, adhesive selection, and bond reliability.
3. Confirm that the actual slab suits the approved shop drawing, including sink and hob cut-outs, tap holes, joints, overhangs, stairs, and access constraints. A slab that passes visual inspection can still fail if its thickness or usable area cannot accommodate the layout.
4. Dry-lay or digitally match adjacent slabs, then mark the approved sequence and photograph it. Approve the sample’s finish, joint colour, edge profile, polish level, and sealer appearance before cutting.
5. Require wet cutting, diamond tooling, heat control, and support around cut-outs. Radiused internal corners reduce cracking risk; sharp square corners, narrow strips, and unsupported overhangs do not.
This verification belongs in the black ASD granite builder supply process and the wider black ASD granite process in Pune. Whether the slabs come through RK GRANITE or another supplier, retain the signed approval record.
Related product
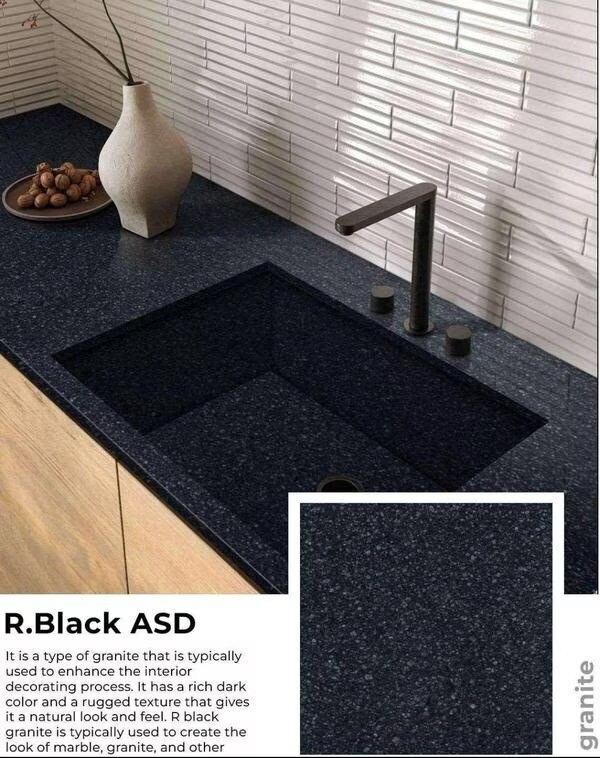
 | Granite RK Granite presents premium R Black ASD Granite in Pune, a bold and elegant natural stone admired for its rich black base with uniform grains and... View product → |
Turn the approved layout into supported, workable pieces
A R Black ASD granite installation starts with a full-size template, not a guess from the drawing. Dry-lay the approved slabs, mark the grain direction and visible tonal changes, then photograph the layout before cutting.
A black ASD granite contractor should reject or repair pieces with cracks, unsafe fissures, corner damage, excessive bowing, or inconsistent thickness.
| Application | Templating and fabrication | Support and risk control |
|---|---|---|
| Counters | Make a rigid template around walls, appliances, sink openings, and overhangs; radius internal cut-out corners. | Support the slab continuously, especially beside cut-outs and at overhangs. |
| Vanities | Template the basin, tap holes, backsplash, and wall irregularities separately. | Keep narrow front rails and tap zones fully supported to prevent cracking. |
| Stairs | Measure each tread, riser, nosing, side return, and landing individually. | Avoid unsupported nosings; plan joints away from impact edges. |
| Floors | Set out room lines, doorways, columns, and movement joints before cutting. | Use full-bed coverage, not isolated adhesive blobs that leave hollow areas. |
| Walls | Transfer openings, corners, levels, and panel joints into a cutting schedule. | Large slabs need compatible back-buttering and controlled handling. |
| Thresholds | Template the exact door width, frame rebate, and finished-floor transition. | Maintain a stable, level bearing surface and avoid a raised trip edge. |
| Exterior work | Allow for façade dimensions, drainage, anchors, joints, and access equipment. | Specify weather-suitable adhesive and mechanical restraint where required. |
Use wet cutting and diamond tooling, while controlling heat during drilling and polishing. Record the final slab layout, rejected or repaired pieces, and concealed support photographs for handover.
Prepare the substrate and choose the fixing system by application
Dust, laitance, paint, oil, loose screed, gypsum and plaster must be removed before fixing. The base must be sound, cured, clean and substantially flat; an uneven or contaminated surface cannot be corrected with isolated adhesive blobs.
Check each R Black ASD piece for bowing, back mesh, resin repairs and thickness changes because these affect coverage and bonding.
| Application | Fixing system | Base and support required |
|---|---|---|
| Interior wall or floor | Manufacturer-specified cementitious stone adhesive, applied continuously with the correct notch | Cured, flat substrate; back-butter large pieces to eliminate voids |
| Wet area | Low-absorption adhesive, waterproofed background and compatible grout | Tanked shower or bathroom base, sealed penetrations and movement joints |
| Countertop or vanity | Stone adhesive for joints, full bedding where required, neutral-cure silicone at walls and cut-outs | Level cabinets or masonry, continuous support, reinforced sink and hob openings |
| Stair or heavy-traffic floor | High-performance adhesive or specified mortar bed with full coverage | Rigid, level base; support nosings and prevent unsupported overhangs |
| Exterior façade | Exterior-rated adhesive only where approved, plus engineered anchors or kerfs | Stable backing, drainage, movement joints and corrosion-resistant mechanical support |
Follow the selected product’s coverage, open time, curing temperature and joint instructions; a generic cement-sand dab can leave hollow areas and cause breakage. Use flexible sealant at changes of plane, perimeters and movement joints, not rigid grout.
This is the practical black asd granite process in Pune, and every r black asd granite installation needs a fixing method matched to its exposure and load.
Control delivery, placement, finishing, and handover
Do not release the work until every visible surface and concealed fixing record has been checked. Knowing how R Black ASD granite installation works in Pune means tracking the material from delivery to final cleaning, not just inspecting the polished finish.
1. Check each delivered piece against the approved slab layout. Record slab markings, lot or batch information, nominal thickness, finish, back mesh or resin repairs, cracks, corner damage, bowing, and rejected or repaired pieces before moving stone indoors.
2. Dry-lay slabs and components in their marked positions before fixing. Confirm shade, directional movement, joint width, edge alignment, overhang support, and the position of sink, hob, tap, stair, and threshold cut-outs; photograph the approved arrangement.
3. During placement, check that the substrate is clean and level, adhesive coverage is adequate, joints remain open and even, and no piece rocks or sounds hollow after bedding. Record the adhesive, mortar, grout colour, sealant, and any mechanical support used.
4. Inspect finished edges, radiused internal corners, polished areas, joints, and exposed faces under strong side lighting. Remove adhesive smears and grout haze with a manufacturer-approved neutral stone cleaner; do not use acidic cement-removal chemicals.
5. Before handover, check for lippage, edge chips, stains, water marks, polishing swirls, cracks, and loose sections. File photographs of concealed preparation, the final layout, product and installation records, sealer product and application date, approved repairs, and written cleaning and care instructions.
Release the area only after the builder signs this record and receives instructions for reporting later hollow sounds, stains, edge cracks, or shade disputes.
Frequently asked questions
What should Pune builders provide before ordering R Black ASD granite?
Provide a site survey, coordinated drawings, and a complete order brief showing finished positions, dimensions, cut-outs, access constraints, and fabrication limits.
Why must builders approve the actual granite slabs before fabrication?
Slabs can differ in shade, grain, fissures, thickness, and usable area. Approving the actual slabs lets you confirm the layout before cutting begins.
How are R Black ASD granite pieces made workable for installation?
Fabricators convert the approved layout into supported pieces with accurate cut-outs, finished edges, joints, labels, and handling provisions.
How do you choose a fixing system for R Black ASD granite?
Choose the system according to the application and substrate, then prepare a clean, level, sound base before applying the specified adhesive, mortar, anchors, or mechanical supports.
What should builders check at delivery and handover?
Control protected delivery and placement, then inspect alignment, support, joints, edge finish, surface condition, sealing or cleaning, and completed installation before handover.
Keywords